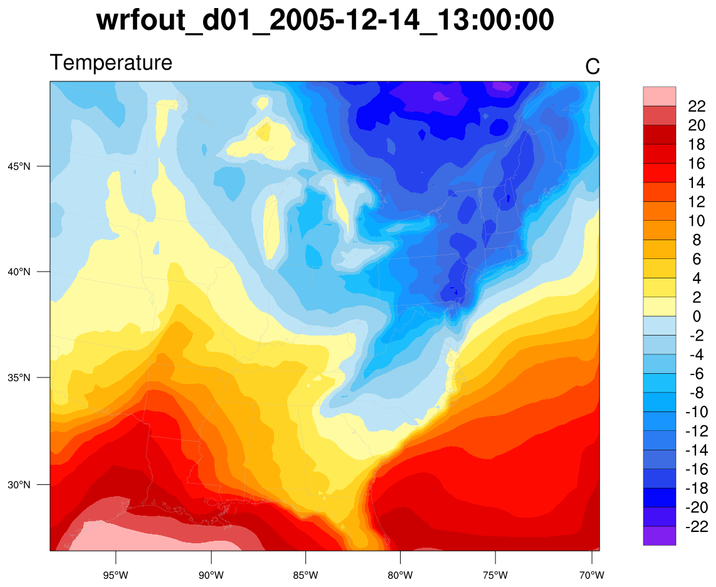
NCL 安裝 這次用 wsl 上的 ubuntu 來建置相關環境看看 , 參考自此
1
2
3
4
5
6
7
8
9
10
11
12
13
14
15
16
#安裝及進入 wsl wsl --install -d ubuntu wsl #安裝 conda wget https://repo.anaconda.com/archive/Anaconda3-2022.05-Linux-x86_64.sh ll bash ./Anaconda3-2022.05-Linux-x86_64.sh source ~/.bashrc # 有裝 zsh 的話 # source ~/.zshrc conda env list conda create -n ncl_stable -c conda-forge ncl conda activate ncl_stable
順帶一提如果不想弄髒環境要有多個 instance 的 wsl 可以這樣設定 , 參考自此 , 這篇也不錯
1
2
3
4
5
6
7
wsl --install --distribution Ubuntu-18.04 wsl --list Ubuntu (預設值) Ubuntu-18.04 #啟動指定的 instance wsl -d Ubuntu-18.04
裝好以後就有 ncdump 這個好用工具可以用 , 可以測試看看 dump nc 檔
1
2
3
4
5
6
7
8
9
10
11
12
13
14
15
16
17
18
19
20
21
22
23
24
25
26
27
28
29
30
31
32
33
34
35
36
37
38
39
40
41
42
ncdump -h YOURNETCDF.nc netcdf YOURNETCDF { dimensions: time = 31 ; latitude = 409 ; longitude = 313 ; variables: double time(time) ; time:_CoordinateAxisType = "Time" ; time:actual_range = 1041422400., 1044014400. ; time:axis = "T" ; time:ioos_category = "Time" ; time:long_name = "Centered Time" ; time:standard_name = "time" ; time:time_origin = "01-JAN-1970 00:00:00" ; time:units = "seconds since 1970-01-01T00:00:00Z" ; float latitude(latitude) ; latitude:_CoordinateAxisType = "Lat" ; latitude:actual_range = 10.02083f, 27.02083f ; latitude:axis = "Y" ; latitude:ioos_category = "Location" ; latitude:long_name = "Latitude" ; latitude:standard_name = "latitude" ; latitude:units = "degrees_north" ; latitude:valid_max = 90.f ; latitude:valid_min = -90.f ; float longitude(longitude) ; longitude:_CoordinateAxisType = "Lon" ; longitude:actual_range = 112.9792f, 125.9792f ; longitude:axis = "X" ; longitude:ioos_category = "Location" ; longitude:long_name = "Longitude" ; longitude:standard_name = "longitude" ; longitude:units = "degrees_east" ; float CHL(time, latitude, longitude) ; CHL:_FillValue = NaNf ; CHL:colorBarMaximum = 30. ; CHL:colorBarMinimum = 0.03 ; CHL:colorBarScale = "Log" ; CHL:ioos_category = "Ocean Color" ; CHL:long_name = "Mean Chlorophyll a Concentration" ;
安裝 Vapor 基本上這個要遇到 wrf 這個鬼格式才有用 , 可以到這裡下載
1
2
wget https://github.com/NCAR/VAPOR/releases/download/3.6.0/VAPOR3-3.6.0-Ubuntu18.sh bash VAPOR3-3.6.0-Ubuntu18.sh
接著設定 $VAPOR_HOME , 他好像不會幫你設定 , 要確認看看
1
2
3
4
5
6
export VAPOR_HOME=~/VAPOR3-3.6.0-Linux export PATH=$PATH:$VAPOR_HOME/bin echo $VAPOR_HOME # 確認看看有沒有裝好 cat $VAPOR_HOME/share/examples/NCL/wrf2geotiff.ncl
資料下載 如果用 chrome 要開啟 ftp 功能的話需要這樣設定 chrome://flags/ => Enable support for FTP URLsjangmiWrfout1 , 可能改名了
1
2
3
4
5
6
7
8
9
10
11
12
13
14
15
16
17
18
19
20
21
22
23
ftp://ftp.ucar.edu/vapor/data/jangmiWrfout1.zip ftp://ftp.ucar.edu/vapor/data #安裝解壓 zip 工具 sudo apt-get install zip unzip mkdir ~/data cd ~/data # curl ftp://ftp.ucar.edu/vapor/data/jangmiWrfout1.zip -O curl ftp://ftp.ucar.edu/vapor/data/jangmiWrfout2.zip -O # culr ftp://ftp.ucar.edu/vapor/data/jangmi_lowres.zip -O # unzip jangmiWrfout1.zip -d jangmiWrfout1 unzip jangmiWrfout2.zip -d jangmiWrfout2 # unzip jangmi_lowres.zip -d jangmi_lowres # 不小心解壓到此目錄的話可以這樣移動 # mkdir jangmiWrfout2 # mv -t jangmiWrfout2 wrfout_d02* cd jangmiWrfout2 for f in *;do mv $f $f.nc;done
Vapor NCL Example 安裝好後要找 NCL 的 example 在這裡
1
2
3
4
5
cd ~/VAPOR3-3.6.0-Linux/share/examples/NCL ls USFilled.ncl worldFilled.ncl wrf_CrossSection2.ncl wrf_EtaLevels.ncl wrf_Height_FirstMod.ncl wrf_Precip_FirstMod.ncl wrf_crossSection4.ncl USOutline.ncl worldOutline.ncl wrf_CrossSection2_Final.ncl wrf_Height.ncl wrf_Precip.ncl wrf_Surface1.ncl wrf_pv.ncl WrfTestScripts.Notes wrf2geotiff.ncl wrf_CrossSection2_FirstMod.ncl wrf_Height_Final.ncl wrf_Precip_Final.ncl wrf_cloud.ncl
tiff2geotiff 因為以前的任務主要目的是把 ncl 繪製的圖丟到 openlayers 上面 , 所以看到這個工具有眼睛為之一亮的感覺 , 加減玩看看 , 他的路徑在此 ~/VAPOR3-3.6.0-Linux/bin , 礙於年代久遠我已經忘了 , 我當初到底怎麼把 wrf2geotiff.ncl 這隻跑起來的 , 也可能沒跑起來 , 不過還是可以用 tiff2geotiff 這個程式去加上座標位置 , 不然就要用 gdal 裡面的功能 , 應該也 ok
另外我看他 example 裡面轉 geotiff 的方法應該也會用到 imagemagick , 裝了以後執行 USFilled.ncl 應該還會噴 ploicy 錯誤這篇設定
1
2
3
4
5
6
7
8
9
10
11
12
13
14
15
16
sudo apt install imagemagick cd /etc/ImageMagick-6 sudo vim policy.xml #註解掉以下內容即可 <!-- <policy domain="coder" rights="none" pattern="PS" /> <policy domain="coder" rights="none" pattern="PS2" /> <policy domain="coder" rights="none" pattern="PS3" /> <policy domain="coder" rights="none" pattern="EPS" /> <policy domain="coder" rights="none" pattern="PDF" /> <policy domain="coder" rights="none" pattern="XPS" /> --> #接著加上這行 <policy domain="module" rights="read|write" pattern="{PS,PDF,XPS}" />
接著可以跑看看 USFilled.ncl 應該就正常會輸出檔案了 , 看他裡面的原理就是用 imagemagick 先轉 ps 為 tiff , 接著再用 tiff2geotiff 去加上 georeferenced注意是在 windows 跑這串
1
2
3
4
5
#從 linux 複製檔案到 windows scp linux_user_name@192.168.137.123:/home/linux_user_name/VAPOR3-3.6.0-Linux/share/examples/NCL/temp.tif "C:/Users/YOURNAME/Desktop" #從 windows 複製進去 linux scp "C:/Users/YOURNAME/Desktop/test.png" linux_user_name@192.168.137.123:/home/linux_user_name/data
其他地雷 萬一出現 conda command not found 可以參考這篇
1 source ~/anaconda3/etc/profile.d/conda.sh
萬一使用 ncl_filedump or 出現以下錯誤 /bin/csh: bad interpreter: No such file or directory
1
2
sudo apt update sudo apt-get install csh
